There are several adjustments and modifications you can make to your Windows system to really make it your own. Modifying the OEM (Original Equipment Manufacturer) data in the system settings is one example of this kind of customization. This data, which is frequently shown in the System Properties box, may contain information like the system model, support details, and manufacturer’s name. We’ll look at How to Edit Windows OEM data in this blog post so you may customize your system.
If you own a computer from a manufacturer such as Dell, Lenovo, or MSI, you may have noticed that the Windows Settings’ About the option contains information about the firm and support choices. Nevertheless, Windows will display an undesirable “to be filled by OEM” one-liner if you construct your own system. Here is a quick tutorial on how to make it happen.
In Windows 10 and 11, you may add OEM info to make the System > About page in Settings display a manufacturer logo, name, and other details. This is the same data that was present in the standard System Properties. It’s a straightforward adjustment that won’t affect the functionality of your computer in any way, but it’s a great opportunity to give your cherished PC a little more personalization.
Step 1 – Where to find the OEM details/ How to Edit Windows OEM
As an alternative, you may click the Windows key + I and choose About from the menu at the bottom of the window. Click Start > Settings > System > About. Windows 10 and 11 present nearly the same data.

PCs manufacturer and seller PCs commonly show extra information for receiving help directly below the Windows specifications, but since the computer used for this functionality is pre-built, none of that is accessible.
Step 2 – Using Registry Editor
A vast database containing nearly every possible OS configuration can be found in the registry of your computer. Normally, if you’ve never done this before, we’d suggest looking into it and making the necessary adjustments because even a small error can result in strange Windows behavior or worse. But in this instance, you won’t break anything at all if you follow our instructions.
Click on Start and type regedit, you should see Registry Editor.
Click this, and your computer will open the window that appears below. Make a registry backup before you make any changes by selecting File > Export > and selecting a secure location for the backup. Whatever you refer to it, be sure to click the All option located at the bottom of the export Windows.

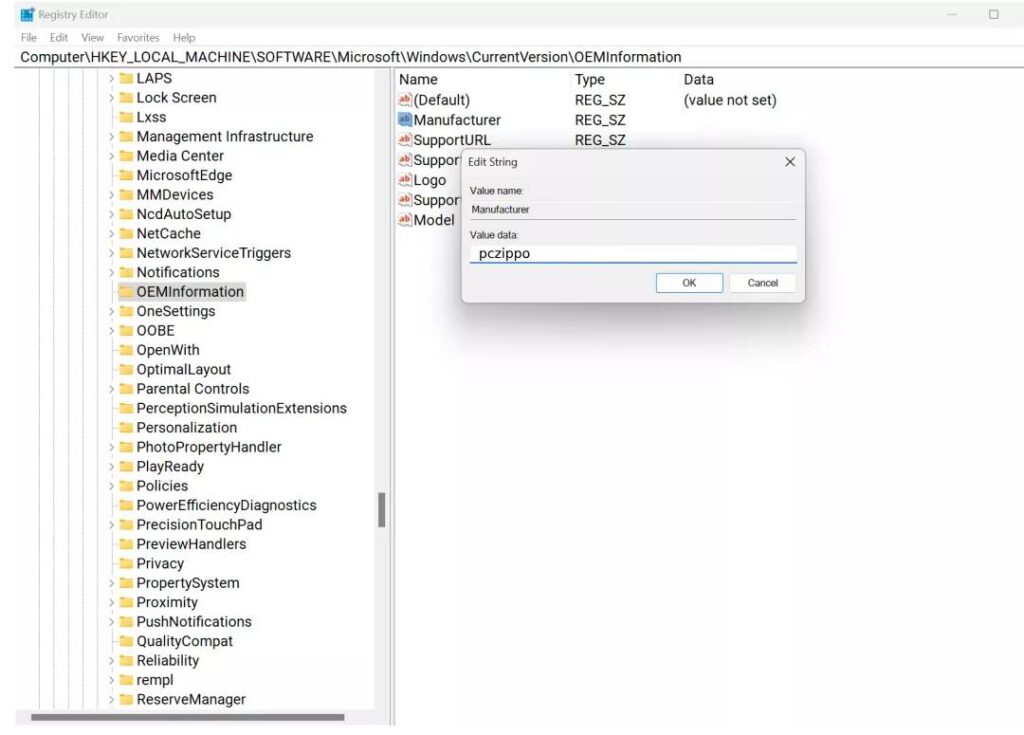
The OEM data that we wish to modify is contained in a single registry entry; however, rather than going there, click on the “Computer” location, as seen in the screenshot.
Copy and paste the following text there and hit Enter:
HKEY_LOCAL_MACHINE\SOFTWARE\Microsoft\Windows\CurrentVersion\OEMInformation

If you have a pre-built PC, you might see several entries like Manufacturer, SupportURL, SupportHours, Logo, SupportPhone, and Model. In our PC, however, the entries on the right are almost entirely blank. Windows is informed what to show in the system information panel by these entries.
Step 3 – Get creative with Adding String Value According To You
We must add those previously mentioned entries to our registry because it is empty. To choose a portion of the empty area in the registry editor’s right panel, right-click on it.

Then click on New > String Value. You should see that a new entry has appeared in the registry, waiting for you to name it.
Ensure that you name them precisely as we have listed them here, and take care to distinguish between capital and lowercase letters. After finishing, You should see the following.

String Names
Double-click on each entry to change it further, and then enter any text you wish in the Value data field. It will be just plain text, with a character limit of 267.
The information displayed by each item is basically self-explanatory; for example, the registry entry titled Manufacturer clearly indicates the name of the PC’s manufacturer.
There are two entries that require specific information into them.
The text you enter for SupportURL needs to be a full web address – using something like pczippo.com or www.pczippo.com is no good – but using https://www.pczippo.com will work just fine.
The Logo entry is unnecessary in Windows 11 because Microsoft’s most recent operating system ignores everything you type into the field. If you have Windows 10, on the other hand, you can get a little image to appear to the right of the system information by typing the whole file address of the image on your computer. This image needs to be in the BMP format and no larger than 120 x 120 pixels.
Learn How To Reinstall Windows And Start Over
Step 4 – Marvel at OEM Editing
With everything filled in, the registry editor content might look something like this:

Until you exit and reopen the Settings WINDOWS, any edits you make in the editor will not take effect. A completely new level of information will now be displayed on your PC!
You can see the adjustments at the top and bottom of the About information, but we’re going to be going overboard with our overstatements. In Windows 10, it is more spectacular than in Windows 11, but that’s just the advancement of software.
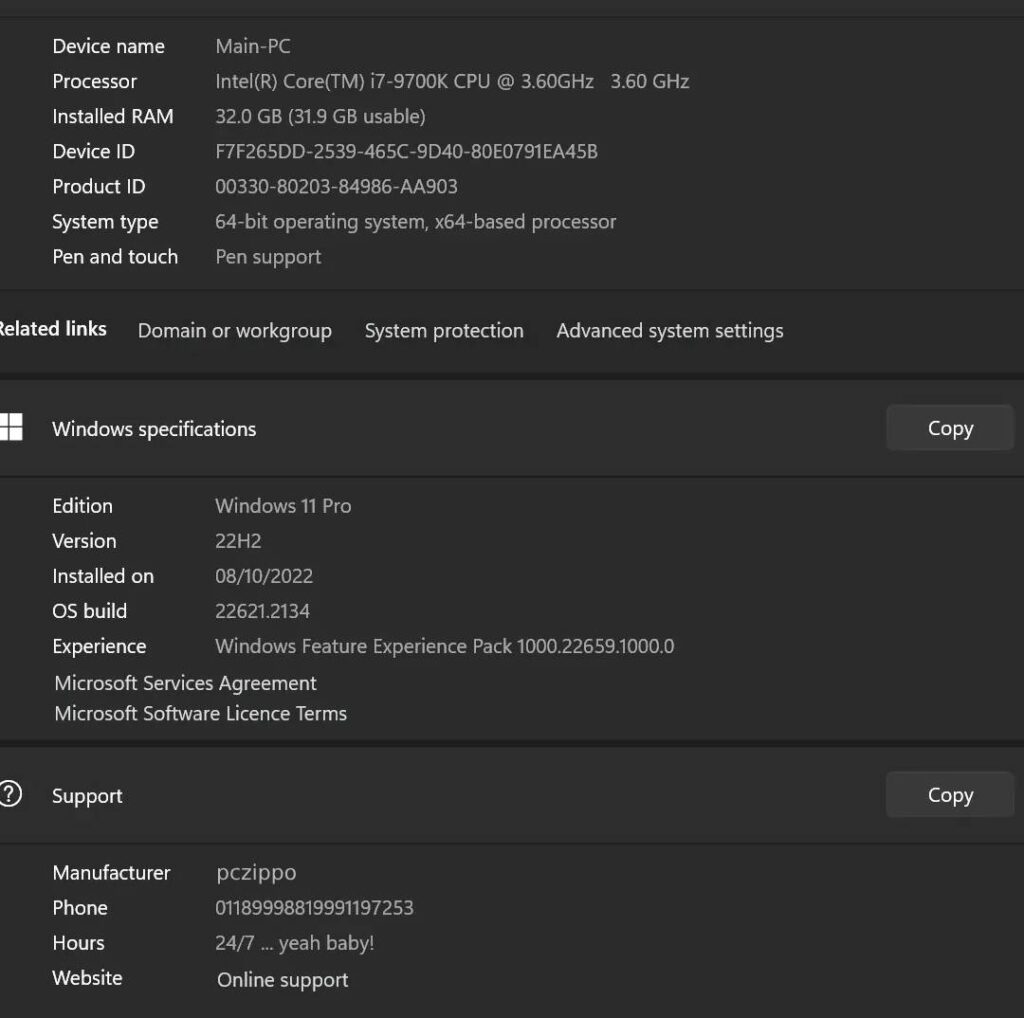
More seriously, if you’re building a friend’s computer, you can include some helpful hints or a convenient link that the new user can utilize in case they run into trouble. Just don’t forget to mention that they may access this by choosing System with a right-click on the Start Menu.
Older versions of Windows should also be able to display this information by altering the registry. Although there are a few applications that can accomplish the same task without requiring registry modification, finding a suitable app just for this purpose is not worth the time when it can be done so quickly and easily by hand.
Bottom Line
Adding unique OEM information to your Windows machinery is a fun way to personalize it. Just keep in mind that they are just decorative adjustments that won’t affect the functionality of your computer. To be safe, make a backup or restore point before you start customizing. You can now customize your Windows system to suit your tastes. Have fun!
Also Read : Every Major Upcoming TV Series in 2024 – Mark Your Calendars